As I said earlier, one of the biggest perks to an electric motor was being able to open up my floor. Previously, in the middle of my cabin was a large coffee table the hid the Yanmar. Now that the Yanmar is gone, I decided to oust the coffee table as well. The new electric motor will be small enough to fit under the floor boards, so time for some renovation!

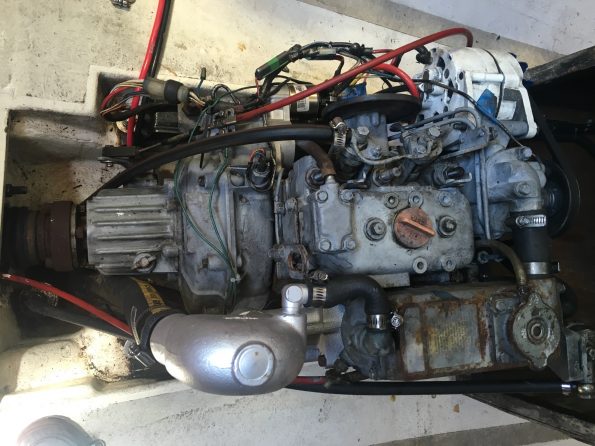
Cinderella's Yanmar Diesel engine space converted to house the new tiny motor drive. We call him "Ol' Sparky"

The first step was to break out the saws and cut away the fiberglass bed that the motor mounted to. This turned out to be a serious PITA. Lots of sweat, saws, and beers later, I had cut the old mounts away. For the record, the sawzall was the best tool for the job, I cut the fiberglass with a dremel and followed it with the sawzall. Any fine work I did with the Ryobi all in one, it’s easy to handle and can cut any of the funky angles. Of course, various pry bars made the process much quicker as well.

The fun thing about this boat project is that all of the tools I own are aboard along with all of my belongings (after all I do live on the boat), so I tend to get crafty with the tools I have to complete the job. I have not come across anything yet that my $250 Ryobi cordless set can’t handle.After the engine bed was removed, I was left with a hole in the floor, which was no good. Fortunately, someone at the marina had decided to tear up his old teak deck and throw it away! New floorboards were free.I was hoping to make the floor flush, and my Ericson has a slight downward angle in the floor which I had to account for when I was cutting the boards to fit. I decided to make the floor in 3 panels. The first panel would be made of wood (free teak), the second and third panel would be made together and later cut into separate pieces. Because the second panel was also to be the new electric motor mount, I decided to make a template out of cardboard to use when I get the steel/aluminum panel that the motor will mount to.After cutting the board and cardboard to fit, I wrapped them in wax paper so I could use them to bed the fiberglass I will be using to make the floor flush.

Fiberglass is easy to do once you get the hang of it, but it really takes a toll on my patience! Fortunately, the controller hasn’t arrived in the mail yet, or I would be chomping at the bit as I watched the fiberglass dry.

When they installed the engine, they did me a great service and aligned it using a CV type joint rather than directly connecting the transmission to the propeller shaft. What this means for me is that I don't have to worry as much about aligning the motor perfectly and the thrust from the propeller won't damage my new electric motor. I just have to make/find a coupling to convert the CV flange to my electric motor's 3/4" shaft.I inquired at one of the local machine shops and was quotes $300! No way was I going to spend that kind of money on a little piece of metal, surely there was another way. After work, I drove down to the local bearing shop and found a sprocket that mounts to my motor, and fits into the bolt pattern of the CV joint, and for a mere $27! One last mounting challenge, I need to find a steel or aluminum plate that I can transfer my cardboard template onto and use to mount the motor to the floor....Follow along on Converting Our Sailboat to EV – Part 6 as I finish up the motor mounts.