Sailing around the world on renewable energy. The concept is as old as sailing itself. Ever since the first sailors raised canvas, sailing around the world on renewable energy was a natural evolution.It's wasn't until the first steamships appeared in the 1800's that we actually moved away from renewable energy. So no, it isn't a novel concept. But I'm not talking about the days of kerosine lamps and canvas sails. Fast forward a couple hundred years.In our everyday lives we enjoy certain "luxuries" that help us feel like we are living a modern life in the 21 century. Running water, lights, phones, computers, tablets, fans, rice cookers, blenders, microwaves, these are all things that we have grown accustomed to in our everyday lives. Are we really willing to live without them just because we decided to go cruising? Camping is one thing, but let's face it, most of us want creature comforts.Sailing around the world on renewable energy is a little different in modern day. Cinderella is not bare bones, we have the luxuries aboard that most people have in their home (minus the microwave and flat screen tv), she is our home after all. And we power all of it with solar.

But where did we begin when sizing our solar system? This can be tricky. You might be tempted to break out the calculators and try to add up all of the energy draw aboard, use estimators to narrow down just how many hours of sunshine you expect to see, size you battery bank to make sure you don't deplete it by more that 60% each day and so on. I'm not saying you shouldn't do that... I'm saying there is an easier way.
Tips on Selecting Solar Panels

Realize that there is no harm in having too much power.When sizing Cinderella's system I started backwards. How much space do we have aboard for solar panels?Most modern sailboats (unless you have a very specialized raceboat) have lots of real estate behind the boom of the mainsail. That space is typically covered with a bimini of some sort to protect the people onboard from the sun. This is an excellent place to install solar panels!On Cinderella, we measured the space from the end of the boom to her stern. We then measured the width of the boat in the same area. Once we had an idea of the available real estate, we went online to research what our options were.It turns out there are three major options: rigid monocrystalline panels, rigid polycrystalline panels, and flexible panels.

Rigid monocrystalline panels are the oldest. They have been around for decades, and are getting better and better every year. Rigid monocrystalline panels produce the most power to area of any panel.

Rigid polycrystalline panels are newer than monocrystalline panels. They don't produce quite as much power per area as monocrystalline panels, but they are far superior when it comes to shading. If the area you have available for panels has lot of shading, polycrystalline panels may be the way to go.

That leaves flexible panels. Flexible panels are the newcomers. They are light and flexible. They don't produce anywhere near the power of rigid panels, but they can be mounted almost anywhere. Most marine brands also have the charge controllers built in, so you can wire them directly to your batteries. The biggest perk is that you can walk on them, so in theory you can open up quite a bit of real estate. Unfortunately thus far, I have not met very many cruisers that are happy with their flexible panels. They don't seem to last as long as their rigid counterparts.
Knowing that we are not only running our home, but also charging our electric motor battery bank, I opted to go with the rigid monocrystalline option. The more power the better. Since we don't have a wind generator, or a radar dome, there is nothing to shade our panels except for our thin backstay.After measuring the available space (about 80" x 90") I started researching brands online. There are lots of threads on this subject. you will find brand diehards, you will find people talking about dollars to watts, you will find enough information to make your head spin.I again offer a simpler solution: study at the spec sheets. All solar panels are made up of solar cells. These cells are wired together to make different voltages, but are roughly 6" x 6" regardless of their efficiency.That translates to a standard width to all solar panels (with the exception of very small panels). Whether they are 190w or 360w, all of the panels are roughly 40" wide.Knowing that, we took that 80" x 90" area and decided to fill it with as much solar panel as we could. This came to roughly two 265w to 360w panels depending on brand and efficiency.

So, now that you have an idea of what you want based on your area to cover, where do you find them?
You may be tempted to go online and try to find the cheapest price, but you will quickly realize that shipping a 40" x 80" panel costs just as much as the panel! This may be ideal for covering a home roof, but not when you only need one or two.Go to your local electrician's supply! They exist in nearly every major city. In Seattle, it was Platt Electric.I walked in to Platt with my tape measure and told the staff what I was doing. They led me into their warehouse and showed me the options. Since they basically buy full pallets of panels for resale, they were excited to cut me a deal on the leftover panels on each pallet. After looking through a few pallets, I found two 345w Solarworld panels that measured 40" x 80". the panels were $250 each, so I got 690w of solar for $500!Not bad considering that has covered our "power bill" for over a year now and allowed us to be fully off the grid, fully sustainable with all of our "luxuries" plugged in.
Selecting your Battery Bank and Charge Controllers
Once you have your panels selected it's time to have a look at your battery bank, and what controller you will put between the panels and your batteries.Charge controllers come in two basic types PWM or "pulse width modulation" and MPPT "Multiple Power Point Tracking".Both of these use electronic circuitry to prevent the panels from destroying your batteries. The circuitry is how they differ.
Pulse Width Modulation is an older technology that works by breaking up the DC current heading to the batteries with a series of switches. These switches open and close so fast that the battery doesn't even notice it. Using a set charge curve for the battery type, these charge controllers very the width of the energy pulse from the panels to meet the battery's ideal charge voltage. This leads to an efficient charger that doesn't boil your batteries.
Multiple Power Point Tracking is a newcomer. It is more efficient that PWM and it was designed for passive energy like solar. MPPT chargers work by a neat little trick discovered by Nicola Tesla, the transformer. The chargers invert DC power to AC power using electronic circuitry. All of that AC energy can then be transformed from very high voltage to the exact voltage the battery needs. The AC power is then converted back to DC power and fed to the batteries.
What does this mean? It means that you can feed very high voltage to an MPPT Charge controller and the controller can take the extra voltage and turn it into useable amperage that won't boil batteries. Since higher voltages have less energy losses, we can send more useable power to the batteries! And use smaller diameter wires to do it.
Obviously, we went with the MPPT charge controller option.
Next step: Sizing the charge controller
Charge controllers are essentially sized by the amount of heat they can dissipate. In the world of electricity, amperage is heat, so we can say that charge controllers are sized by the amps they can handle.Since our panels can produce 690 watts, we can divide 690 watts by 12 volts and get almost 58 amps. Thats quite a bit! It's more than most standard alternators output. But that is also the theoretical best case scenario. I assumed that we would normally produce about half of our maximum, so I found a charge controller that could handle 30 amps. I chose the Midnight Solar Kid.

The Kid was reasonably priced at about $350 and was designed for the marine environment. They also have the option of paralleling, so if I decided I wanted to utilize the most from my panels, I could get a second Kidd and wire them together to handle the extra amps.

Since the Kid could also charge a 48V battery bank, I purchased a second one to charge our 48V electric motor drive. This also gave me redundancy at sea. If anything happened to one, we have a backup onboard to get us to the next port.
The last piece of the puzzle: the battery bank!

The battery bank is where you store and draw power from when the sun isn't shining. There have been huge improvements in battery technology over the past few years, and it seems like the prices of the new technology is always dropping. Since I purchased our house bank for Cinderella over a year ago, we have noticed that the prices have dropped by about 30% on LiFePO4 technology!We again sized our battery bank based on the space aboard Cinderella. She had two tired old 110ah agm batteries when I bought her, so we replaced them with two new batteries.At the time Lithium was out of my price range, and I didn't see a huge benefit to the weight difference in just two batteries. Although the new LiFePO4 technology looks very good.Fortunately, there was a new carbon foam battery technology in the market. A company called Ocean Planet Energy partnered with Caterpillar and brought us the Firefly Oasis Battery. They coated standard lead acid plates with some type of carbon foam that prevented sulphation, a lead acid battery's arch nemesis. This resulted in a battery with lithium like characteristics, at much lower prices.

We purchased two of these carbon foam batteries from Fisheries Supply in Seattle, and have been happy with them ever since. Unlike standard lead acid batteries, we could discharge them almost completely without damaging their lifespan. We essentially got four 110ah batteries in half the footprint.
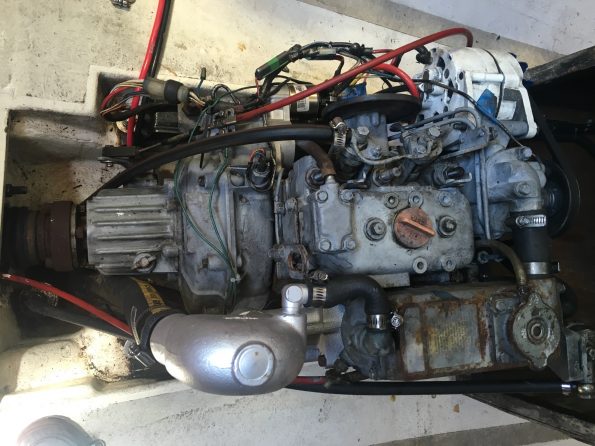
Here is a photo of our motor battery bank of Dyno Batteries that lasted us three years in the tropics. Not bad but after lot of abuse, they are ready to be replaced with Firefly.

There you go! I hope this helps you design your solar system from Mercury to Pluto.Obviously, its best to have a plan before you purchase all of your pieces. If you are curious how we wired our system click here.